Saturday, 3 June 2023

How with OpenAI Whisper do I transcribe all mp4s in a folder?

Problem:

I'd like to transcribe all mp4 files in a folder on both Mac and Windows using Whisper.

I am familiar with scripting and command-line, and have already set up Whisper to work on my machine.


Windows example solution:

The following is an example solution for Windows. Save this in a .bat file and run it in the folder you'd like to process all mp4 files. Modify the script as you need to.

This example transcribes in English with Whisper set up to use CUDA. It skips over any already transcribed mp4 files. It is not recursive.


e.g. transcribe_all_mp4.bat:
for %%f in (*.mp4) do (
	echo %%~nf
	if not exist "%%~nf.txt" (
		echo will process %%~nf.mp4
		whisper "%%~nf.mp4" --language English --device cuda
	) else (
		echo will NOT process %%~nf.mp4
	)
)

Mac example solution:

The following example is a single Terminal command you can use in MacOS with Whisper already set up.

Note that this example command does not check for existing transcriptions. It does however specify Whisper to use the medium model. It is not recursive. Modify the command as you need to.

In Terminal in the folder where you want to transcribe your .mp4 files:

for f in *.mp4 ; do whisper $f --model medium ; done

Notes:

The above solutions in Windows and Mac were verified to work between February 2023 to June 2023 (for real-life conference and film work). As of this time the good folks over at Whisper haven't yet implemented batch processing of files.

Hope these examples helped you start to get past where you too got stuck :)


References:

Thursday, 20 April 2023

Unity WebGL publishing Color Space incompatibility error

Problem:

I'm a beginner in Unity and when completing the first WebGL publishing tutorial in Essentials of real-time 3D, I get the following error:
"In order to build a player, go to 'Player Settings...' to resolve the incompatibility between the Color Space and the current settings."

How do I get past this error in order to continue the tutorial?


Solution:

One solution is as follows. First, go to Player Settings, just as the error hints.
Go to "Player". You'll see another error about color spaces and a hint about what to do about it.
Unselect Auto Graphics API.
Congratulations, you're now ready to continue your Unity beginner's tutorial and build a WebGL game.

Notes:

This how-to is meant for beginners who are starting from scratch, and is intentionally without details. If you'd like to learn more about Unity color spaces, start by having a look in the following documentation link and then read up on the related articles: https://docs.unity3d.com/Manual/LinearLighting.html.

This how-to was verified to work in April 2023 using Unity Editor 2021.3.22f1. Your results may vary.


References:

Thursday, 13 April 2023

Unpublish Unity WebGL Game

Problem:

On Unity Play (play.unity.com) I've published a game as part of a tutorial and now I want to remove it.

Warning:

Following these instructions will remove your game from Unity Play, including all saved stats, challenge submissions, etc. It doesn't look like this can be undone, so continue at your own risk.

One solution:

The following shows one way to delete your game from Unity Play. Please note that this likely cannot be undone. You'll lose all achievements, data, etc., associated with the published game, even if you republish (confirmed as of April 2023).

  1. If not already logged in, login to your Unity account
  2. Navigate to the page displaying all of your games. As of April 2023 this is at https://play.unity.com/discover/mygames
  3. Open the game you'd like to edit or delete/unpublish, then look for the 3 dots "..." indicating a menu
  4. Select "delete" or "edit", depending on if you'd like to delete or edit.
  5. Read the confirmation carefully as there's no turning back. If you agree to deleting your game and losing any data related to it, then go for it.
  6. Congratulations, you've deleted your game!

Notes:

The above instructions were verified to work in April 2023. Your mileage may vary as the Unity team is constantly busy upgrading your favorite game engine and services.

References:

Monday, 12 July 2021

Find executables installed via apt

Problem:

I want to list all executables installed via apt (or apt-get). I know the name of the package installed and I am already comfortable with using shell commands.

Solution:

To list all executables installed for a package, in your shell use the following command while replacing "packagename" with the actual package name:
  dpkg -L packagename | xargs file | grep executable
  

Example:

For example, if I want to list all executables installed in the package "nullmailer":
  dpkg -L nullmailer | xargs file | grep executable
  

Other reminders:

To list all files installed for a package, in your shell and replacing "packagename" with your package name, use:
  dpkg -L packagename
  

To list all executables for a package (named "packagename") installed in the "opt" folder, use:

  dpkg -L packagename | xargs file | grep ^/opt | grep executable
  

References:

Friday, 20 November 2020

Service Canada On-Hold Music of 2020

Question:

What's the on-hold music I hear when calling Service Canada?

Solution:

Memento by Robert Michaels is the song many folks "North of the 49th parallel" have been hearing during the 2020 pandemic while on hold calling Service Canada.

Why this post?

During the pandemic of 2020, someone I know needed to call a department of the Canadian government called Service Canada. After several hours of hearing a relaxing tropical-vacation-like song on loop -- and after a phone call with a wonderfully polite and helpful agent we should mention -- this song continued to play inside our heads.

After tracking it down, we saw that several other kindred spirits had also stumbled upon what this relaxing earworm was, which made us smile.

At only 1800 views on Youtube, we realized that more people may have heard this on hold than from the artist, so we wanted to direct a few more eyeballs to his work and level the playing field. So ladies and gents (and all others): if you want to re-live that relaxing, or at least memorable on-hold-for-hours-during-the-pandemic-oh-Canada experience and give kudos to the artist then please have a look at Robert Michaels' Memento -- enjoy!

https://www.youtube.com/watch?v=8lesCxbFsI0

Notes

This blog post was accurate and verified as of November 2020. Things may have changed by the time you are reading this blog post. If the pandemic is still going on then please stay safe, wherever you are in the world. Thank you for dropping by!

Monday, 20 July 2020

Check Mac fan speed for Mojave in Terminal

Problem:

I would like to check the fan speed of my Mac in Mojave without installing any additional programs. I am already comfortable using Terminal. I don't care much about fan or temperature details, I just want to know if the fan is working. How can I check the fan speed?

Solution:

The following steps below can help you check fan speed in Terminal. This is one of several ways to do so.

  • open Terminal
  • use the following command:
    
              sudo powermetrics -i 200 --samplers smc | grep Fan
            

If all went well then you should see the fan speed printed to the terminal repeatedly:

References:

Wednesday, 1 July 2020

Find missing fonts using Inkscape 1.0 or earlier

Problem:

Using Inkscape, how do I find which fonts are missing but needed in my svg project?

I have moved svg inkscape image files from one machine to another and the new machine is missing fonts the old machine has.

Workarounds:

There are a few indirect ways to find fonts that are missing but required by a project in Inkscape. A few of which are shown below. These might not find all the missing fonts, but they should be a good start in your search.

Hopefully these workarounds help until Inkscape includes a feature for this.

1. Text and Font panel

The first way is to open the "Text and Font" panel and have a look at what fonts have a red line through it. Assuming your project has already been opened:

  1. Find the "Text and Font..." dropdown menu item and select it 
  2. In the "Text and Font" panel, have a look at which fonts have a red strikethrough

2. List all fonts and then manually check

Assuming that you know what fonts are installed in your system (or how to find out), you can also list all fonts used in your project and then compare them with your known installed fonts.

To find the names of all fonts used in your project:

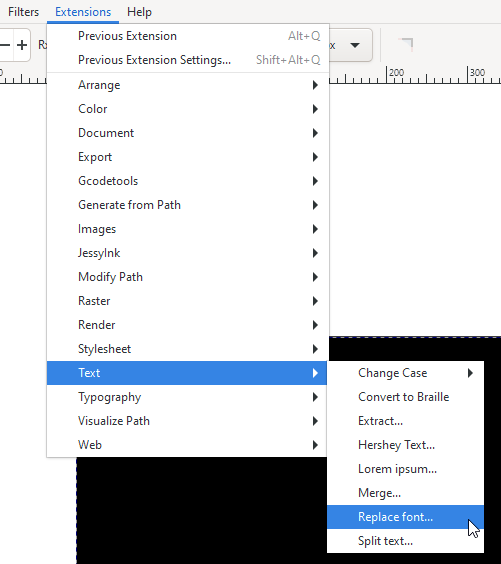
  1. In the extensions menu, navigate to "Replace font..."
  2. Then go to the "List all fonts" tab and hit "Apply".
    .
  3. If all goes well then the fonts should be listed
  4. Use this list to compare to your system's installed fonts.

3. Click on text that looks incorrect

When you click on text elements that look incorrect because fonts are missing, Inkscape will show you the font name and an icon indicating that the font is missing.

This should work well for anyone with simpler projects, or projects that only have one or two fonts missing.

References:

Tuesday, 28 April 2020

Prepend to every line in Visual Studio Code

Problem:

I want to add a string to the beginning of every line in a selection of code or text.

For example, I am reformatting what used to be a liquid templating list to a YAML list, e.g.

From:

item1
item2
item3

To:

  - item1
  - item2
  - item3


One solution - overview:

There are many ways to prepend to code quickly in bulk. One of the more versatile ways is by using the replace tool in Visual Studio Code combined with regex (i.e. regular expressions).

The "find" field will have the caret character ^ which indicates the beginning of a line. The "replace" field will have whatever you want to add at the beginning of lines.

Example:

For example, if I have the code in the screenshot below that I want to prepend the string " - " to:

First, select the code to prepend to:

Then invoke the "replace" tool:

Make sure you select the option to replace in your selection only. Then use a regex search for "^" as the beginning of a line, and replace with what you want to prepend. Do this for each line one by one until you have the results you desire.

After you are done, the lines should now be prepended with the desired string.


Notes:

There are many other ways that you can prepend lines in Visual Studio Code. The how-to above shows the regex replace method because it's a powerful tool that can handle many scenarios, not just prepending to lines.

Other methods may include installing plugins, using Visual Studio's multi-line cursor/select tools, etc.

References:

Friday, 17 April 2020

How to fix notch overlap in Flutter Basic Widgets example code

Problem:

I am learning Flutter, and the app bar on top in the Basic Widgets section of the Introduction to widgets section of the Flutter docs is being blocked by the notch of an iPhone or phone simulator, as seen below. How can I fix this?

Notes:

This bug was confirmed in April 2020. It's possible that the Flutter team has updated their documentation by the time you are reading this. (If so, thank you Flutter team!)

Also note that this how-to is just one way to workaround the issue. The later code in the Flutter documentation shows better practices on which widgets to use, etc., to avoid the notch. That being said, this workaround is for anyone who is trying to debug this before moving on.

Workaround:

The workaround is highlighted below, followed by a brief explanation:

import 'package:flutter/material.dart';

class MyAppBar extends StatelessWidget {
  MyAppBar({this.title});

  // Fields in a Widget subclass are always marked "final".

  final Widget title;

  @override
  Widget build(BuildContext context) {
    return Container(
      height: 56.0, // in logical pixels
      padding: const EdgeInsets.symmetric(horizontal: 8.0),
      decoration: BoxDecoration(color: Colors.blue[500]),
      // Row is a horizontal, linear layout.
      child: Row(
        //  is the type of items in the list.
        children: [
          IconButton(
            icon: Icon(Icons.menu),
            tooltip: 'Navigation menu',
            onPressed: null, // null disables the button
          ),
          // Expanded expands its child to fill the available space.
          Expanded(
            child: title,
          ),
          IconButton(
            icon: Icon(Icons.search),
            tooltip: 'Search',
            onPressed: null,
          ),
        ],
      ),
    );
  }
}

class MyScaffold extends StatelessWidget {
  @override
  Widget build(BuildContext context) {
    // Material is a conceptual piece of paper on which the UI appears.
    return Material(
      child: SafeArea(
        // Column is a vertical, linear layout.
        child: Column(
          children: [
            MyAppBar(
              title: Text(
                'Example title',
                style: Theme.of(context).primaryTextTheme.title,
              ),
            ),
            Expanded(
              child: Center(
                child: Text('Hello, world!'),
              ),
            ),
          ],
        ),
      ), // SafeArea
    ); // Material
  }
}

void main() {
  runApp(MaterialApp(
    title: 'My app', // used by the OS task switcher
    home: MyScaffold(),
  ));
}

The above code encloses the other widgets in the example code within the safe area of the device via the SafeArea widget - a class that adds appropriate insets for a given device.

If all went well, your results should now look similar to the image below and you can now move on to learning more Flutter, free from the iPhone-notch-overlap.

If you'd like to learn more, please check out the references below.


References:

Wednesday, 15 April 2020

Get the sitemap of Blogger and Blogspot blogs

Problem:

I want to get or generate the xml sitemap of my Blogger.com or Blogspot blog.

I am using these sitemaps for Google Search Console, Bing Webmaster Tools, and other webmaster tools.

Solution:

The good news is that blogger already generates these sitemaps for you. For your own blog, use the following pages at the root level of your blog's domain: "sitemap.xml" and "sitemap-pages.xml".

For example, this blog's URL is grammarofdev.blogspot.com, so its sitemaps can be found at

Now that you know your Blogger weblog's sitemap URLs, you can submit those URLs to the webmaster tools of your liking. For example, here's what the sitemaps above look like after being successfully submitted to Bing Webmaster Tools:


References:

1 way to add vertical rulers in Visual Studio Code

Problem:

How do I add vertical rulers in Visual Studio Code's editor views?

I want to add standard guide rulers at the 80 and 120 character columns.

Solution:

In VSCode 0.10.10 or newer:

  1. Open Settings
    (Windows: File→Preferences→Settings; OS X/MacOS: Code→Preferences→Settings)
  2. Search for "editor.rulers", then select to edit
  3. Add the number of columns the rulers should be at. For example, the classic standards of 80 characters and 120 characters are shown below:
  4. You should now see vertical rulers in your editor if done correctly and if your Visual Studio Code version is compatible. For older versions, restarting VSCode may be required to see the change.

Notes:

The solution above was tested to work on Visual Studio Code 1.44.0. Your results may vary in other versions.

References:

Monday, 6 April 2020

bash scripting reminders of basics

Problem:

I want quick reminders for bash shell scripting because I don't write bash scripts often enough to memorize everything.

Notes:

The following reminders assume you're already familiar with the basics of bash shell scripting and simply need a reminder of more commonly used syntax, etc. These reminders are for myself but I hope you also find them useful.

Reminder shortcuts

As the number of reminders grow I hope this index will help you find what you need. (It certainly helps me.)


Reminders:

Top of script starts with #!/bin/bash

#!/bin/bash
See this tldp.org reference page for details.

Simple variables

Examples of simple variables

NAME="Delta"
echo "Hello $NAME!"

Concatenate strings


HELLO="Hello, "
NAME="Lily"

echo $HELLO$NAME
# output: Hello, Lily

HELLO="Hello, "
NAME="Alex"
GREET="${HELLO}${NAME}!"

echo "$GREET"
#output: Hello, Alex!


GREET="Hello, "
GREET+="Ninja"

echo "$GREET"
#output: Hello, Ninja

String quotes of bash scripting

DIRECTION="Right"
echo "Turn $DIRECTION"  # => Turn Right
echo 'Turn $DIRECTION'  # => Turn $DIRECTION

Bash for-loop


VAR=""
for NAME in 'alpha' 'bravo' 'charlie' 'delta'; do
  VAR+="${NAME} "
done

echo $VAR
# output: alpha bravo charlie delta 

Bash if-and, bash if-or

if [ $FILENAME == 'important.txt' ] && [ -f $FILENAME ]; then
  echo "this is an important file"
fi
if [ $NAME == 'Hector' ] || [ $NAME == 'Miguel' ]; then
  echo "this person is on a hero's journey"
fi

Bash check if directory exists

DIR="/usr/mydir/"

if [ -d "$DIR" ]; then
  echo "directory exists"
else
  echo "directory not found"
  exit 1
fi
DIR="/usr/mydir/"

[ "$DIR" == "" ] && { echo "directory string is empty"; exit 1; }
[ -d "${DIR}" ] && echo "directory exists" || echo "directory not found"

Bash if directory does not exist


DIR="/usr/mydir/"

if ! [ -d "$DIR" ]; then
  echo "directory does not exist"
else
  echo "directory exists"
fi

Bash check if file exists

if [ -f "/opt/myfile.txt" ]; then
  echo "file found"
else
  echo "file not found
fi

For items in bash array

DIR3="/opt/mydir3"
DIRTOCHECK=("/opt/mydir1" "/opt/mydir2" $DIR3)

for dir in "${DIRTOCHECK[@]}"
do
  if [ -d "${dir}" ]; then
    echo "found directory ${dir}"
  else
    echo "did not find directory ${dir}"
  fi
done

Command line arguments in bash scripting

# example: yourscript.sh arg1 2nd-arg

echo "All arguments values:" $@
# output: All arguments values: arg1 2nd-arg

echo "First argument:" ${1}
# output: First argument: arg1

echo "Second argument:" ${2}
# output: Second argument: 2nd-arg

echo "Total arguments:" $#
# output: Total arguments: 2

For more detailed information, please refer to this tecadmin.net tutorial

How to check if git repo needs update from remote upstream with bash scripting

This how-to assumes you already have a git repository installed, a remote upstream setup, and have navigated into the local repository via your script.

git fetch
if [ $(git rev-parse HEAD) == $(git rev-parse @{u}) ]; then
  # add logic for when no update is needed, e.g.
  echo 'already up to date.'
else
  # add logic for when update is needed, e.g.
  echo 'updating to latest.'
  git pull
fi

How to check if script is on correct git branch for bash script

The following example assumes master branch is desired and the script has already navigated to the local repository.

if ! [ $(git rev-parse --abbrev-ref HEAD) == "master" ]; then
  echo "NOT in master branch."
else
  echo "in master branch."
fi

Why these reminders?

This page is intended to remind myself quickly without requiring too much reading. I hope it's helped you out, too.

References:

Friday, 20 March 2020

Slf4j NoClassDefFoundError when compiling SparkJava sample project

Problem:

When trying out the SparkJava demo for websockets (spark-websockets, "Using WebSockets and Spark to create a real-time chat app"), I get the following compilation error:

Exception in thread "main" java.lang.NoClassDefFoundError: org/slf4j/LoggerFactory
 at spark.Service.<clinit>(Service.java:56)
 at spark.Spark$SingletonHolder.<clinit>(Spark.java:51)
 at spark.Spark.getInstance(Spark.java:55)
 at spark.Spark.<clinit>(Spark.java:61)
 at Chat.main(Chat.java:19)
Caused by: java.lang.ClassNotFoundException: org.slf4j.LoggerFactory
 at java.net.URLClassLoader.findClass(URLClassLoader.java:381)
 at java.lang.ClassLoader.loadClass(ClassLoader.java:424)
 at sun.misc.Launcher$AppClassLoader.loadClass(Launcher.java:349)
 at java.lang.ClassLoader.loadClass(ClassLoader.java:357)
 ... 5 more

Workaround:

The following workaround worked as a quick way to try out the demo code:
  • Open the project's pom.xml file
  • Add the following dependency:
    
    <dependency>
      <groupId>org.slf4j</groupId>
      <artifactId>slf4j-api</artifactId>
      <version>1.7.21</version>
      <scope>compile</scope>
    </dependency>


If this worked, the project should now compile properly.

Notes:

The above workaround is one of many solutions that can work towards a successful compile. Others include adding a JAR file for a logger, for example. This solution was chosen as it is the quickest for a beginner to do while learning how to use SparkJava or while learning programming in Java.

This how-to was verified to work in revision 8cc09e8cea9257a0df3449106a57ad0467faf39b (Sep 4, 2017) of the spark-websockets project. Your results may vary for other revisions.

References:

Thursday, 19 March 2020

Meteor VSCode esversion 6 jslint error

Problem:

When using Visual Studio Code to edit my Meteor project, I keep seeing the error:

'import' is only available in ES6 (use 'esversion: 6'). (W119) jshint(W119)

For example:

Workaround:

  • To hide the jshint errors: in the main folder of your Meteor project, if the file named ".jshintrc" does not exist then add it
  • In this .jshintrc file, add the following text:
    {
        "esversion": 6
    }
    

You may need to close and reopen the project in VSCode. If the workaround is successful, you should no longer see the esversion 6 error.

Notes:

This workaround was verified to help remove the jslint errors while using Visual Studio Code version 1.43.1 with Meteor 1.10.1. Your results may vary given different versions. Please also note that this workaround hides the jshint error from being highlighted, but it won't fix compilation errors if your Meteor project isn't properly setup to compile esversion 6.

References:

Thursday, 12 March 2020

Catalina Jekyll bad interpreter error

Problem:

When trying to run jekyll in Terminal, I get the following error:

zsh: /usr/local/bin/jekyll: bad interpreter: /System/Library/Frameworks/Ruby.framework/Versions/2.3/usr/bin/ruby: no such file or directory

I recently upgraded MacOS.

Before you start:

This how-to assumes you already have knowledge of Terminal and the 'sudo' command, given that you've already installed Jekyll in the past. If not, please proceed at your discretion as 'sudo' command can be harmful if used incorrectly.

Solution:

In Terminal, reinstall jekyll via homebrew:


sudo gem install jekyll

Why this works:

The upgrade to Catalina changed key dependencies of Jekyll. While it is possible to manually link them or add them to your PATH, reinstalling Jekyll should provide an easier and more robust solution. You'll likely also need to reinstall any other gems you need.

Disclaimer:

This solution was verified to work in MacOS 10.15.3 with Jekyll 4.0.0. Your mileage may vary with other versions.

References:

Wednesday, 3 October 2018

Reminder: SparkJava 2.7.2 pom.xml known to work for new projects

Problem

For SparkJava 2.7.2, I'd like a known set of POM.xml dependencies and properties that work so I can kick-start my project. The settings in the SparkJava "getting started" tutorial result in exceptions.

Example POM.xml snippet

In your POM.xml, try these to start off:

    <properties>
        <java.version>1.8</java.version>
        <maven.compiler.source>1.8</maven.compiler.source>
        <maven.compiler.target>1.8</maven.compiler.target>
    </properties>
  
  
    <dependencies>
  
        <dependency>
            <groupId>org.eclipse.jetty</groupId>
            <artifactId>jetty-server</artifactId>
            <version>9.4.6.v20170531</version>
        </dependency>
  
        <dependency>
            <groupId>org.slf4j</groupId>
            <artifactId>slf4j-api</artifactId>
            <version>1.7.21</version>
            <scope>compile</scope>
        </dependency>

        <dependency>
            <groupId>org.slf4j</groupId>
            <artifactId>slf4j-simple</artifactId>
            <version>1.7.21</version>
        </dependency>
 
        <dependency>
            <groupId>com.sparkjava</groupId>
            <artifactId>spark-core</artifactId>
            <version>2.7.2</version>
        </dependency>
    </dependencies>

Notes

The above dependency versions and properties were observed to work on 2018-10-03 with SparkJava version 2.7.2. Your mileage may vary.

Once you have your SparkJava project working, feel free to change versions to suit your own project needs.

References

Monday, 2 July 2018

Fix 07_BoggieBot.playground errors "Cannot call value of non-function type 'NSGraphicsContext?" and "Cannot convert value of type 'NSApplication.ModalResponse' to expected argument type 'Int'"

Problem:

When trying to learn from 07_BoogieBot.playground alongside Apple's Everyone Can Code "Intro to App Development with Swift", I get errors similar to:
07_BoogieBot.playground/Sources/Recorder.swift:26:51: Cannot call value of non-function type 'NSGraphicsContext?'
07_BoogieBot.playground/Sources/Recorder.swift:33:99: Cannot call value of non-function type 'NSGraphicsContext?'
07_BoogieBot.playground/Sources/Recorder.swift:70:31: Cannot convert value of type 'NSApplication.ModalResponse' to expected argument type 'Int'
The console shows me the following:
Playground execution failed: error: /var/folders/1g/_b7g8rjd71j_mwjxdj29vllc5x9cxx/T/playground11-16e897..swift:3:8: error: no such module '_7_BoogieBot_Sources' import _7_BoogieBot_Sources
I am using XCode 9.4.1 and macOS 10.13.5

Before you start:

You'll want to make a backup of lesson 7's code first. Just make a copy of the folder in Finder. We'll be editing the code that runs the playground, so this way you can undo by restoring the backup if you've forgotten what you changed and introduced a bug.

Workaround:

You're learning coding for the first time, and you've been given a chance to debug the playground you're learning from. Cool!

Here's a few quick steps to get your BoogieBot lesson going!

Step: Have a look at the errors

In XCode you can view what errors have broken your code. In our case, click here:
You'll see a list of errors appear in the navigator in red. Try to click one:
Wow, that's more code that you've seen in the previous lessons. No worries. Just focus on the problem you're trying to solve and ignore the rest.

Step: Fix the 'context' bug

For the lines that have:
if let context = NSGraphicsContext.current()?.cgContext
Remove the (), so they look like:
if let context = NSGraphicsContext.current?.cgContext
If you save the file and the 2 errors go away, you've made progress. Congrats on debugging so far!

Why does this code change work?

Someone at Apple had changed NSGraphicsContext.current from a function to a property.

As you recall from an earlier lesson, programmers will often have to build on code made by others. In this case the code happens to be from those who worked on part of the graphics programming for macOS 10.13. These are changes you'd see if coding in XCode 9 (instead of XCode 8).

Step: Fix the Modal.Response bug

For the code that looks like:
if (savePanel.runModal() == NSFileHandlingPanelOKButton) {
Change it to look like:
if (savePanel.runModal() == .OK) {

Why does this code change work?

Without getting too technical, essentially someone at Apple had changed the way this test should work.

IF you're really curious and aren't learning to code for the first time, have a look at https://developer.apple.com/documentation/appkit/nsapplication/modalresponse

Step: Go back to the BoogieBot Playground

Now that you've debugged the code and saved it, check that no errors still exist. (The yellow warnings won't block you from lesson 7.)
Cool. Now you can return to learning about BoogieBot by clicking here and going back to your playground:
Happy boogie-ing!

Notes

This how-to was tested to work using XCode 9.4.1 and macOS 10.13.5. The bug was seen in the playground downloaded sometime June 2018. Your results may vary depending on versions, and if Apple fixed the playground by the time you read this post. Code can change pretty quickly in real life.

If you ran into this bug, hopefully you were able to fix it and learn how to make your boogie bot dance using Swift!

Friday, 1 June 2018

How to fix kernel_require.rb:55:in `require': cannot load such file -- xcodeproj (LoadError)

Problem:

When I try to build and deploy in XCode 9.3, I get the following error related to: "kernel_require.rb:55:in `require': cannot load such file -- xcodeproj (LoadError)"

/System/Library/Frameworks/Ruby.framework/Versions/2.3/usr/lib/ruby/2.3.0/rubygems/core_ext/kernel_require.rb:55:in `require': cannot load such file -- xcodeproj (LoadError)
 from /System/Library/Frameworks/Ruby.framework/Versions/2.3/usr/lib/ruby/2.3.0/rubygems/core_ext/kernel_require.rb:55:in `require'
 from /Development/ELD.iOS/ELD/Scripts/generate_resources.rb:4:in `
' Command /bin/sh failed with exit code 1

Possible solutions to try:

There are several possible ways to address this issue. Two are listed here to try.

  1. Install XCode command line tools from Apple
  2. Install the gem "xcodeproj"

To install XCode command line tools...

  1. Go to https://developer.apple.com/download/more/ and login
  2. Search for the command line tools for your version of XCode, download it, then install it.

To instead install the gem "xcodeproj"...

  1. Open a Terminal window
  2. Use the command:
    sudo gem install xcodeproj

Notes:

This how-to was tested to work for a project on macOS High Sierra 10.13.4 and XCode 9.3. Your results may vary. It assumes a little working knowledge of XCode and Terminal.

Best of luck!

Tuesday, 30 January 2018

Cannot type into Spotlight in macOS

Problem:

I suddenly cannot type anything into Spotlight.

It opens and closes, and even does so with the Command-Space shortcut. I just can't type in it when it's open.

Workaround:

  • Open Terminal
  • Use the following command:
    killall Spotlight
  • If all goes well, the magnifying glass for Spotlight will disappear and reappear, and you'll be able to type into Spotlight again

Notes:

This was tested to work in macOS 10.12.6.

Wednesday, 24 January 2018

Seamonkey XPCOMGlueLoad error

Problem:

I updated Seamonkey on Linux Mint and it now won't launch. I am running a 64-bit version of Linux Mint.

In terminal, I tried to run Seamonkey but got an error similar to:

$ /path/to/seamonkey/seamonkey

XPCOMGlueLoad error for file /path/to/seamonkey/libmozgtk.so:
libgtk-3.so.0: cannot open shared object file: No such file or directory
Couldn't load XPCOM.

When checking, I do have GTK 3:

$ locate libgtk-3.so.0

/usr/lib/x86_64-linux-gnu/libgtk-3.so.0
/usr/lib/x86_64-linux-gnu/libgtk-3.so.0.1800.9

Solution:

It may be that you're attempting to run a 32-bit version of Seamonkey on 64-bit Linux Mint. The default Seamonkey download from Mozilla as of Jan 2018 is the 32-bit version.

You can find the 64-bit version in their releases page: http://archive.mozilla.org/pub/seamonkey/releases/

For example, for 2.49.1:

Notes:

This solution worked for Seamonkey 2.49.1 running on 64-bit Linux Mint 18.1 Serena as of Jan 2018. Your mileage may vary with other versions and configurations.

Also for the system tested, the auto-update is not an issue because this browser will only be used on a local network. (You'll see the note from Mozilla when you launch the browser... at least for version 2.49.1). Keep this in mind if your situation is different and you need a browser that reliably auto-updates.

References:

http://archive.mozilla.org/pub/seamonkey/releases/ http://forums.mozillazine.org/viewtopic.php?f=40&t=3005417