Saturday 3 June 2023

How with OpenAI Whisper do I transcribe all mp4s in a folder?

Problem:

I'd like to transcribe all mp4 files in a folder on both Mac and Windows using Whisper.

I am familiar with scripting and command-line, and have already set up Whisper to work on my machine.


Windows example solution:

The following is an example solution for Windows. Save this in a .bat file and run it in the folder you'd like to process all mp4 files. Modify the script as you need to.

This example transcribes in English with Whisper set up to use CUDA. It skips over any already transcribed mp4 files. It is not recursive.


e.g. transcribe_all_mp4.bat:
for %%f in (*.mp4) do (
	echo %%~nf
	if not exist "%%~nf.txt" (
		echo will process %%~nf.mp4
		whisper "%%~nf.mp4" --language English --device cuda
	) else (
		echo will NOT process %%~nf.mp4
	)
)

Mac example solution:

The following example is a single Terminal command you can use in MacOS with Whisper already set up.

Note that this example command does not check for existing transcriptions. It does however specify Whisper to use the medium model. It is not recursive. Modify the command as you need to.

In Terminal in the folder where you want to transcribe your .mp4 files:

for f in *.mp4 ; do whisper $f --model medium ; done

Notes:

The above solutions in Windows and Mac were verified to work between February 2023 to June 2023 (for real-life conference and film work). As of this time the good folks over at Whisper haven't yet implemented batch processing of files.

Hope these examples helped you start to get past where you too got stuck :)


References:

Thursday 20 April 2023

Unity WebGL publishing Color Space incompatibility error

Problem:

I'm a beginner in Unity and when completing the first WebGL publishing tutorial in Essentials of real-time 3D, I get the following error:
"In order to build a player, go to 'Player Settings...' to resolve the incompatibility between the Color Space and the current settings."

How do I get past this error in order to continue the tutorial?


Solution:

One solution is as follows. First, go to Player Settings, just as the error hints.
Go to "Player". You'll see another error about color spaces and a hint about what to do about it.
Unselect Auto Graphics API.
Congratulations, you're now ready to continue your Unity beginner's tutorial and build a WebGL game.

Notes:

This how-to is meant for beginners who are starting from scratch, and is intentionally without details. If you'd like to learn more about Unity color spaces, start by having a look in the following documentation link and then read up on the related articles: https://docs.unity3d.com/Manual/LinearLighting.html.

This how-to was verified to work in April 2023 using Unity Editor 2021.3.22f1. Your results may vary.


References:

Thursday 13 April 2023

Unpublish Unity WebGL Game

Problem:

On Unity Play (play.unity.com) I've published a game as part of a tutorial and now I want to remove it.

Warning:

Following these instructions will remove your game from Unity Play, including all saved stats, challenge submissions, etc. It doesn't look like this can be undone, so continue at your own risk.

One solution:

The following shows one way to delete your game from Unity Play. Please note that this likely cannot be undone. You'll lose all achievements, data, etc., associated with the published game, even if you republish (confirmed as of April 2023).

  1. If not already logged in, login to your Unity account
  2. Navigate to the page displaying all of your games. As of April 2023 this is at https://play.unity.com/discover/mygames
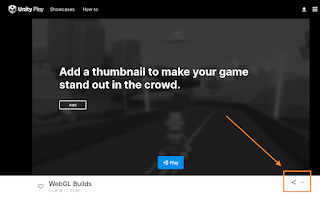
  3. Open the game you'd like to edit or delete/unpublish, then look for the 3 dots "..." indicating a menu
  4. Select "delete" or "edit", depending on if you'd like to delete or edit.
  5. Read the confirmation carefully as there's no turning back. If you agree to deleting your game and losing any data related to it, then go for it.
  6. Congratulations, you've deleted your game!

Notes:

The above instructions were verified to work in April 2023. Your mileage may vary as the Unity team is constantly busy upgrading your favorite game engine and services.

References:

Monday 12 July 2021

Find executables installed via apt

Problem:

I want to list all executables installed via apt (or apt-get). I know the name of the package installed and I am already comfortable with using shell commands.

Solution:

To list all executables installed for a package, in your shell use the following command while replacing "packagename" with the actual package name:
  dpkg -L packagename | xargs file | grep executable
  

Example:

For example, if I want to list all executables installed in the package "nullmailer":
  dpkg -L nullmailer | xargs file | grep executable
  

Other reminders:

To list all files installed for a package, in your shell and replacing "packagename" with your package name, use:
  dpkg -L packagename
  

To list all executables for a package (named "packagename") installed in the "opt" folder, use:

  dpkg -L packagename | xargs file | grep ^/opt | grep executable
  

References:

Friday 20 November 2020

Service Canada On-Hold Music of 2020

Question:

What's the on-hold music I hear when calling Service Canada?

Solution:

Memento by Robert Michaels is the song many folks "North of the 49th parallel" have been hearing during the 2020 pandemic while on hold calling Service Canada.

Why this post?

During the pandemic of 2020, someone I know needed to call a department of the Canadian government called Service Canada. After several hours of hearing a relaxing tropical-vacation-like song on loop -- and after a phone call with a wonderfully polite and helpful agent we should mention -- this song continued to play inside our heads.

After tracking it down, we saw that several other kindred spirits had also stumbled upon what this relaxing earworm was, which made us smile.

At only 1800 views on Youtube, we realized that more people may have heard this on hold than from the artist, so we wanted to direct a few more eyeballs to his work and level the playing field. So ladies and gents (and all others): if you want to re-live that relaxing, or at least memorable on-hold-for-hours-during-the-pandemic-oh-Canada experience and give kudos to the artist then please have a look at Robert Michaels' Memento -- enjoy!

https://www.youtube.com/watch?v=8lesCxbFsI0

Notes

This blog post was accurate and verified as of November 2020. Things may have changed by the time you are reading this blog post. If the pandemic is still going on then please stay safe, wherever you are in the world. Thank you for dropping by!

Monday 20 July 2020

Check Mac fan speed for Mojave in Terminal

Problem:

I would like to check the fan speed of my Mac in Mojave without installing any additional programs. I am already comfortable using Terminal. I don't care much about fan or temperature details, I just want to know if the fan is working. How can I check the fan speed?

Solution:

The following steps below can help you check fan speed in Terminal. This is one of several ways to do so.

  • open Terminal
  • use the following command:
    
              sudo powermetrics -i 200 --samplers smc | grep Fan
            

If all went well then you should see the fan speed printed to the terminal repeatedly:

References:

Wednesday 1 July 2020

Find missing fonts using Inkscape 1.0 or earlier

Problem:

Using Inkscape, how do I find which fonts are missing but needed in my svg project?

I have moved svg inkscape image files from one machine to another and the new machine is missing fonts the old machine has.

Workarounds:

There are a few indirect ways to find fonts that are missing but required by a project in Inkscape. A few of which are shown below. These might not find all the missing fonts, but they should be a good start in your search.

Hopefully these workarounds help until Inkscape includes a feature for this.

1. Text and Font panel

The first way is to open the "Text and Font" panel and have a look at what fonts have a red line through it. Assuming your project has already been opened:

  1. Find the "Text and Font..." dropdown menu item and select it 
  2. In the "Text and Font" panel, have a look at which fonts have a red strikethrough

2. List all fonts and then manually check

Assuming that you know what fonts are installed in your system (or how to find out), you can also list all fonts used in your project and then compare them with your known installed fonts.

To find the names of all fonts used in your project:

  1. In the extensions menu, navigate to "Replace font..."
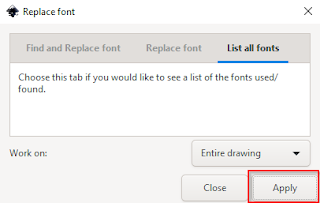
  2. Then go to the "List all fonts" tab and hit "Apply".
    .
  3. If all goes well then the fonts should be listed
  4. Use this list to compare to your system's installed fonts.

3. Click on text that looks incorrect

When you click on text elements that look incorrect because fonts are missing, Inkscape will show you the font name and an icon indicating that the font is missing.

This should work well for anyone with simpler projects, or projects that only have one or two fonts missing.

References:

Tuesday 28 April 2020

Prepend to every line in Visual Studio Code

Problem:

I want to add a string to the beginning of every line in a selection of code or text.

For example, I am reformatting what used to be a liquid templating list to a YAML list, e.g.

From:

item1
item2
item3

To:

  - item1
  - item2
  - item3


One solution - overview:

There are many ways to prepend to code quickly in bulk. One of the more versatile ways is by using the replace tool in Visual Studio Code combined with regex (i.e. regular expressions).

The "find" field will have the caret character ^ which indicates the beginning of a line. The "replace" field will have whatever you want to add at the beginning of lines.

Example:

For example, if I have the code in the screenshot below that I want to prepend the string " - " to:

First, select the code to prepend to:

Then invoke the "replace" tool:

Make sure you select the option to replace in your selection only. Then use a regex search for "^" as the beginning of a line, and replace with what you want to prepend. Do this for each line one by one until you have the results you desire.

After you are done, the lines should now be prepended with the desired string.


Notes:

There are many other ways that you can prepend lines in Visual Studio Code. The how-to above shows the regex replace method because it's a powerful tool that can handle many scenarios, not just prepending to lines.

Other methods may include installing plugins, using Visual Studio's multi-line cursor/select tools, etc.

References:

Friday 17 April 2020

How to fix notch overlap in Flutter Basic Widgets example code

Problem:

I am learning Flutter, and the app bar on top in the Basic Widgets section of the Introduction to widgets section of the Flutter docs is being blocked by the notch of an iPhone or phone simulator, as seen below. How can I fix this?

Notes:

This bug was confirmed in April 2020. It's possible that the Flutter team has updated their documentation by the time you are reading this. (If so, thank you Flutter team!)

Also note that this how-to is just one way to workaround the issue. The later code in the Flutter documentation shows better practices on which widgets to use, etc., to avoid the notch. That being said, this workaround is for anyone who is trying to debug this before moving on.

Workaround:

The workaround is highlighted below, followed by a brief explanation:

import 'package:flutter/material.dart';

class MyAppBar extends StatelessWidget {
  MyAppBar({this.title});

  // Fields in a Widget subclass are always marked "final".

  final Widget title;

  @override
  Widget build(BuildContext context) {
    return Container(
      height: 56.0, // in logical pixels
      padding: const EdgeInsets.symmetric(horizontal: 8.0),
      decoration: BoxDecoration(color: Colors.blue[500]),
      // Row is a horizontal, linear layout.
      child: Row(
        //  is the type of items in the list.
        children: [
          IconButton(
            icon: Icon(Icons.menu),
            tooltip: 'Navigation menu',
            onPressed: null, // null disables the button
          ),
          // Expanded expands its child to fill the available space.
          Expanded(
            child: title,
          ),
          IconButton(
            icon: Icon(Icons.search),
            tooltip: 'Search',
            onPressed: null,
          ),
        ],
      ),
    );
  }
}

class MyScaffold extends StatelessWidget {
  @override
  Widget build(BuildContext context) {
    // Material is a conceptual piece of paper on which the UI appears.
    return Material(
      child: SafeArea(
        // Column is a vertical, linear layout.
        child: Column(
          children: [
            MyAppBar(
              title: Text(
                'Example title',
                style: Theme.of(context).primaryTextTheme.title,
              ),
            ),
            Expanded(
              child: Center(
                child: Text('Hello, world!'),
              ),
            ),
          ],
        ),
      ), // SafeArea
    ); // Material
  }
}

void main() {
  runApp(MaterialApp(
    title: 'My app', // used by the OS task switcher
    home: MyScaffold(),
  ));
}

The above code encloses the other widgets in the example code within the safe area of the device via the SafeArea widget - a class that adds appropriate insets for a given device.

If all went well, your results should now look similar to the image below and you can now move on to learning more Flutter, free from the iPhone-notch-overlap.

If you'd like to learn more, please check out the references below.


References:

Wednesday 15 April 2020

Get the sitemap of Blogger and Blogspot blogs

Problem:

I want to get or generate the xml sitemap of my Blogger.com or Blogspot blog.

I am using these sitemaps for Google Search Console, Bing Webmaster Tools, and other webmaster tools.

Solution:

The good news is that blogger already generates these sitemaps for you. For your own blog, use the following pages at the root level of your blog's domain: "sitemap.xml" and "sitemap-pages.xml".

For example, this blog's URL is grammarofdev.blogspot.com, so its sitemaps can be found at

Now that you know your Blogger weblog's sitemap URLs, you can submit those URLs to the webmaster tools of your liking. For example, here's what the sitemaps above look like after being successfully submitted to Bing Webmaster Tools:


References: