Monday, 15 January 2018

Exit XQuartz Full Screen Mode macOS Sierra

Problem:

How do I exit XQuartz full-screen mode?

Solution:

When in XQuartz:

  • Press the keyboard shortcut Command-, (command + comma)
  • Uncheck full-screen mode in the preferences

References:

Friday, 12 January 2018

How to take Touch Bar screenshots on Mac

Problem:

How do I take a screenshot of the Touch Bar on a Mac?

Solution:

To take a Touch Bar screenshot and...

  • ...save as a file on the desktop: Shift-Command-6
  • ...copy to clipboard: Control-Shift-Command-6

Example Screenshot:

Notes:

The shortcuts in the solution above are defaults. They can be configured by going to "System Preferences" -> Keyboard -> Shortcuts -> "Screen Shots", and setting new shortcuts.

The how-to was verified to work in macOS 10.12.6 on a MacBook Pro with a Touch Bar. Your mileage may vary with other OS versions.

References:

Thursday, 11 January 2018

USB-to-Serial on OS X/macOS - an Example

Problem:

I have a USB-to-Serial adapter that I need to use on a Mac. How do I configure it, and how do I read/write to it?

I am already partially familiar with using serial ports on Linux and Windows.

Notes:

This post is written as a reminder and contains just enough information to reproduce these steps in the future. It is not thorough. A little Google may be required in order to clarify or expand on some points.

The following steps were verified to work with macOS 10.12.6, with a very specific USB-to-serial adaptor that happened to work fine with Apple's default drivers. Your mileage may vary with other configurations and devices.

Steps Overview:

  1. Before you start, if drivers do not already exist then install them.
  2. Plug USB-to-Serial adaptor into your Mac
  3. Find info in "About this Mac" - More below
  4. Setup null modem and speed using Network Preferences - More below
  5. Find the device's path to access the Linux/POSIX way - More below

Step: Find adapter info:

To find out some basic information about your USB-to-Serial adapter, use the following steps.

  1. Go to "About This Mac" and click "More Info..." or "System Report..." (depending on your OS version)
  2. Find your device in the system report under "USB", and make note of what is there. This will help you identify your device in other steps.

Step: Configure serial communication using Network Preferences

To configure your USB-to-Serial adapter speed, etc., for use with other apps on your Mac, use the following steps.

  1. Open "System Preferences" and open the "Network" preferences pane
  2. Select your USB-to-Serial adapter if it is in the list, or add it then select it
  3. Click "Advanced..."
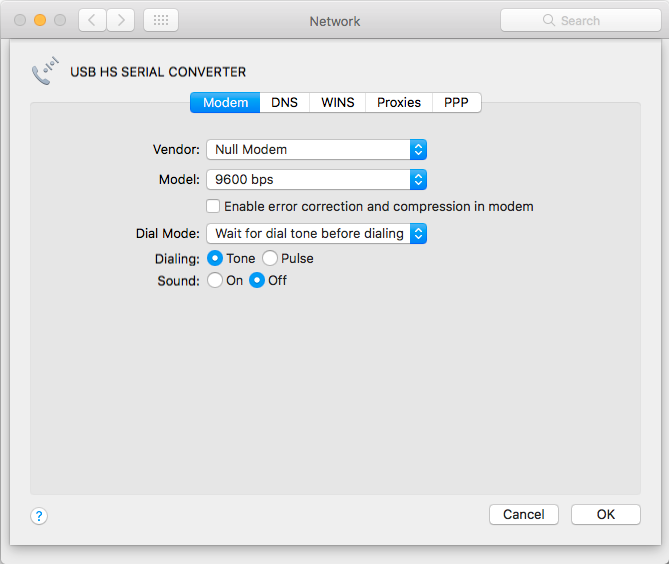
  4. Configure as null modem with the desired baud rate. The example screenshot below shows the attached device configured to 9600 bps (as well as some other configuration)

Step: Access your usb-to-serial port the Linux/Posix way:

  • to find the path to your serial port, in Terminal type in the following command and find your device:
    ioreg -c IOSerialBSDClient | grep usb
  • in the example screenshot above, the serial port is "/dev/cu.usbserial-FTAN3DQ" and an example of its use in VirtualBox is shown in the screenshot below.
  • (optional) to test your serial port directly, you can use the "screen" command in Terminal. More on this command in Apple's screen man page

    References:

  • How to change Ubuntu timezone to UTC

    Problem:

    How can I change my timezone to UTC in Ubuntu?

    Solution:

    1. In a terminal window type:
      sudo dpkg-reconfigure tzdata
      
    2. Then select "None of the above":
    3. After that, select "UTC":

    If all goes well then the "date" command should show the date and time in UTC.

    References:

    Friday, 17 November 2017

    Run gpsfeed+ in Lubuntu 16.04

    Problem:

    I would like to run gpsfeed+ in Lubuntu 16.04.

    I am running Lubuntu in VirtualBox. I want to output to guest COM1, and send this feed to a physical serial port on COM6 on my host machine.

    Solution:

    To run first time:
    1. download the gpsfeed+.tcl script
    2. open terminal
    3. install "wish" (in terminal: sudo apt-get install tk)
    4. install "libudp-tcl" (in terminal: sudo apt-get install libudp-tcl)
    5. (in terminal, navigate to folder where gpsfeed+.tcl script is)
    6. run gpsfeed+.tcl script (in terminal: wish gpsfeed+.tcl)

    To output to COM1 in Lubuntu VirtualBox guest:

    1. open VirtualBox settings for your guest machine
    2. navigate to "serial ports" and enable COM1
    3. to send the guest COM1 to a host serial port, configure port mode to send to host (for instance, to pipe to COM6 on a Windows host, use the settings in the screenshot below)
    4. in gpsfeed+: go to Connection->Serial/IP, and set Port to "/dev/ttyS0" (see this stack exchange question on how to find your serial ports in Linux)
    5. if needed, you may need to give read/write privileges to ttyS0 in terminal (make sure you know the implications first, or google them). One way is to add your user to the dialout group: "sudo usermod -G dialout -a (your username here)"
    6. if all works then you should see the NMEA sentences being sent to your serial port after starting the simulation in gpsfeed+
    VirtualBox settings to enable COM1 in guest and send to COM6 on host:
    Gpsfeed+ setting to send to COM1 in VirtualBox Lubuntu:

    Notes:

    These instructions were found to work using a Windows 10 host, VirtualBox 5.1.30, Lubuntu 16.04.1 32-bit, and gpsfeed+ v0.58. A physical serial port exists on COM6 on the host machine. With other settings, your mileage may vary.

    References:

    Wednesday, 23 August 2017

    Rename local git branch

    Problem:

    How do I rename a local git branch using git command line?

    Solution:

    If you'd like to rename the currently checked-out branch to "new_branch_name":

    git branch -m new_branch_name
    

    If you'd like to rename any branch ("old_branch_name") to "new_branch_name":

    git branch -m old_branch_name new_branch_name
    

    References:

    Thursday, 20 July 2017

    Make local Git branch track a remote branch

    Problem:

    How do I get a local git branch to track a remote branch?

    Solution:

    The following examples assume a branch "thebranch" and a remote "myremote". They also assume you are using git in the command line.

    For Git 1.8.0 and later:

    If you've already checked out "thebranch" on your local, then:

    git branch -u myremote/thebranch
    

    If you haven't checked out "thebranch" on your local, then:

    git branch -u myremote/thebranch thebranch
    

    For Git 1.7.0 until 1.7.12.4, if you've checked out "thebranch" on your local, then:

    git branch --set-upstream-to=myremote/thebranch
    

    If you haven't checked out "thebranch" on your local, then:

    git branch --set-upstream-to=myremote/thebranch thebranch
    

    References:

    Saturday, 8 July 2017

    Make Google Play Music ignore a folder

    Problem:

    How do I make Google Play Music ignore a folder of audio files on my Android device?

    I have a bunch of audio books, language lessons, and voice recordings that I do not want to play when listening to music.

    Solution:

    One solution is to add a new file and name it ".nomedia" into the folder you would like Google Play Music to ignore.

    This file can be empty, and the period in the front front of the filename is necessary.

    Notes:

    This was tested to work on devices using Android 5 and Android 6.0.1. Your mileage may vary on other devices.

    This trick will work with any app that uses a media scanner which ignores folders with ".nomedia". See some of the references below for other examples.

    In order to create the .nomedia file, you can either use your computer or use a file manager on your Android (such as "Amaze" - turn on "show hidden files and folders" in the settings to see the results).

    References:

    Saturday, 24 June 2017

    Show SSIDs in Windows 10 command prompt

    Problem:

    In Windows, what is one quick way that I can list nearby detected wifi networks, and related information about access points?

    I am currently working on an app and need to see if several access points share the same SSID, and IT does not allow me to install network stumblers or similar programs.

    Solution:

    In the command prompt, you can use either "netsh wlan show networks" or "netsh wlan show all".

    Example output of "netsh wlan show all":

    More detailed instructions:

    1. Press the following key combination: [windows key] + R
    2. Type in "cmd" in the Run dialog that appears, then click OK
    3. Type in "netsh wlan show all" or "netsh wlan show networks"
    4. A list of nearby access points currently detected will appear if you have done this correctly

    Friday, 3 February 2017

    C# Ticks to human-readable date/time

    Problem:

    I'd like to get a human-readable date/time for a number of Ticks in C#.

    Tool:

    Try the tool below :)

    Ticks:
    DateTime(UTC):
    DateTime(local):

    (Please note that this might not work in all browsers due to limitations in number size that a browser can handle. Also, please let me know if I goofed up the calculation. Thanks!)

    Notes on calculation:

    • ticks to microtime = ticks / 10000
    • microtime to Unix time = microtime - 62135596800000
    • then convert Unix time to human-readable using Javascript Date()

    References: